Total: £12.99
Introduction of 3D printing with high-viscosity castable resins
3D printing with high-viscosity castable resins presents a unique set of challenges and opportunities, particularly within resin-based additive manufacturing processes such as LCD, DLP, and SLA. These specialized resins, which are typically used for investment casting in jewellery, creating dental moulds, and producing high-detail prototypes, are formulated to burn out cleanly without residue, making them ideal for precision applications. However, their thicker consistency (higher viscosity) compared to standard resins makes them more difficult to process.
Unlike low-viscosity resins that flow easily and self-level quickly, high-viscosity castable resins resist movement, making it harder for fresh resin to flow beneath the model during printing. This can lead to print failures, poor layer adhesion, or defects such as bubbles and incomplete curing. Additionally, the increased peel forces during layer separation and the need for optimal resin temperature further complicate the printing process.
To achieve reliable and high-quality prints with these resins, users must fine-tune multiple aspects of the printing workflow. This includes selecting the right build plate surface, adjusting exposure and lift settings, maintaining proper resin temperature, and ensuring proper model orientation and support structures. Moreover, post-processing becomes even more critical to ensure clean burnout and final part accuracy.
This article provides a comprehensive set of practical guidelines, tips, and best practices for successfully 3D printing with high-viscosity castable resins, helping both beginners and experienced users improve print consistency and quality in demanding applications.
- Choose the Right Build Plate Surface
When printing with high-viscosity castable resins, one of the most critical factors affecting print success is the adhesion of the first few layers to the build plate. These resins, due to their thick consistency, do not flow or spread as easily as low-viscosity materials. As a result, the initial layers may not fully wet or bond to a smooth build plate surface, leading to print detachment or warping early in the process.
- Grooved and Perforated Build Plates: Enhancing Mechanical Adhesion
Using grooved or perforated build plates significantly improves the mechanical interlocking between the resin and the surface. These features provide physical “anchors” that allow the cured resin to grip onto the build platform more securely. The grooves and holes act as cavities into which the resin can flow and harden, creating a firm hold that is less reliant on chemical adhesion alone.
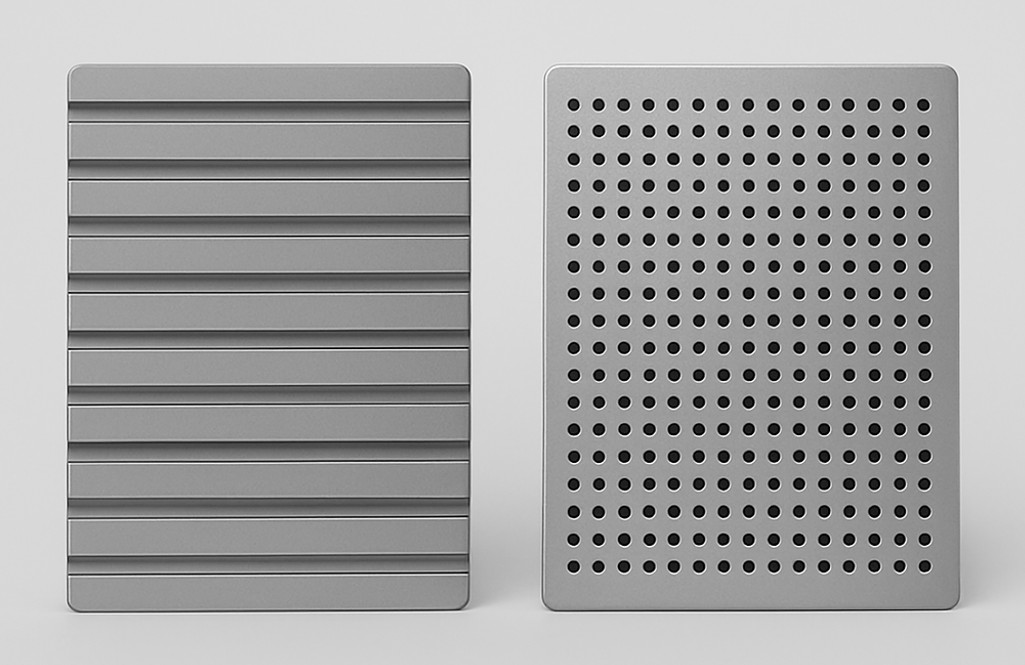
This mechanical grip is particularly beneficial during the peel process in bottom-up resin printing technologies like LCD and DLP, where each new layer must be pulled away from the transparent FEP film. High-viscosity resins can create strong suction forces during this peel step, which may cause parts to detach if the bond to the build plate is insufficient. Grooved and perforated surfaces reduce the likelihood of such failures by stabilizing the print through better anchoring.
- Surface Texture and Geometry Considerations
While grooved and perforated plates offer better adhesion, their design must be balanced:
- Grooves should not be too deep, as excessive texture can make part removal difficult and potentially damage delicate castable prints.
- Perforation patterns (e.g., mesh or honeycomb structures) should be fine enough to enhance adhesion but not so aggressive that they imprint visibly on the printed object.
- Surfaces with fine diagonal or crosshatch grooves offer a good compromise, increasing surface area and grip without compromising part quality.
- Avoid Smooth Surfaces
Build plates with mirror finishes or overly smooth coatings are generally not suitable for high-viscosity castable resins. These surfaces may cause the initial layers to slip or fail to bond, especially if the resin is thick and slow-moving. Even if the print starts correctly, weak adhesion can lead to failures mid-print when the part is under stress during layer separation.
- Maintenance and Cleanliness
Regardless of texture, a build plate must always be clean and properly levelled:
- Resin residue, cured particles, or dust can interfere with adhesion.
- Misalignment can cause uneven layer curing, leading to detachment at weaker spots.
Regular cleaning with isopropyl alcohol (IPA) and gentle sanding (if applicable) can help maintain surface performance over time.
-
Optimize Layer Settings for castable resins
High-viscosity castable resins require careful tuning of printing parameters to ensure successful curing, proper layer formation, and stable part adhesion. Unlike low-viscosity resins that self-level quickly and require minimal tuning, high-viscosity resins behave more sluggishly, making timing, curing energy, and movement settings far more critical. Here are the most important layer-related parameters to optimize:

- Bottom Exposure Time
The bottom exposure time defines how long the printer cures the first few layers of the print. With thick resins, light penetration through the material is more difficult due to:
- Reduced optical clarity,
- Slower flow that prevents even spreading,
- Potential pigment load in specialized castable formulas (such as red or green castable resins).
To compensate:
- Increase bottom exposure time significantly (often 50–100% more than for standard resins).
- Typical values may range from 30 to 60 seconds, depending on the resin and printer’s light source.
- This ensures that the resin cures deeply and bonds tightly to the build plate, forming a strong foundation.
- Number of Bottom Layers
The number of bottom layers also affects overall adhesion and strength at the base:
- For high-viscosity resins, increasing the number of bottom layers to 6–10 (or even more for tall or heavy models) is recommended.
- Each of these layers helps gradually build a robust base that can withstand the peeling forces during printing.
More bottom layers:
- Compensate for any minor inconsistencies in curing caused by the resin’s thickness,
- Distribute stress more evenly, reducing the likelihood of part detachment in early layers.
- Normal Exposure Time
Once the base is formed, normal exposure time (for all remaining layers) must be adjusted appropriately:
- High-viscosity resins often require 10–30% longer exposure per layer than lower-viscosity alternatives.
- A good starting point is 6–9 seconds per layer, depending on resin opacity, printer LCD power, and layer height.
Tip: Test exposure time using validation prints (e.g., exposure test models or calibration rings) to dial in the ideal settings before printing complex geometries.
- Lift Speed and Lift Height
Because of the resin’s thickness, the time it takes for fresh resin to flow under the model between layers is increased.
To allow proper resin replenishment:
- Reduce lift speed to minimize suction forces and avoid mechanical shock to the model.
- Increase lift height to create enough vertical clearance for resin to flow evenly.
- Add a sufficient delay after lifting (wait before next exposure) to allow the resin to settle back into place before the next layer begins.
Typical settings for high-viscosity resins:
- Lift speed: 30–60 mm/min
- Lift height: 5–8 mm
- Wait time after lift: 2–5 seconds
These settings prevent the formation of bubbles, voids, and underexposed areas due to poor resin flow.
- Layer Thickness (Z-Height)
Although high-resolution prints often use 0.025–0.05 mm layers, printing castable resins at such thin layers can be problematic when viscosity is high. Thicker layers may be preferable:
- Use 0.05 mm or 0.1 mm layer height for better flow and more reliable results.
- Thicker layers reduce the number of peel steps, minimizing stress on the model and printer.
- Temperature Control
Controlling the temperature of the printing environment and the resin itself plays a critical role in the success of 3D printing with high-viscosity castable resins. These resins tend to be thick and slow-moving at room temperature, which can hinder proper layer formation, delay resin flow, and increase the risk of printing defects such as incomplete curing, bubbles, and failed supports.

Proper temperature management significantly improves resin flow, layer adhesion, and overall print reliability. Here’s how to effectively implement it:
- Why Temperature Matters for High-Viscosity Resins
High-viscosity resins exhibit non-Newtonian fluid behaviour, meaning their flow properties change under temperature and stress. At lower temperatures, they:
- Flow more slowly,
- Take longer to refill between layers,
- Exhibit increased internal resistance (drag), and
- Tend to trap bubbles or form uneven layers.
At slightly elevated temperatures, their viscosity decreases, allowing:
- Easier resin movement beneath the print,
- Better surface levelling between layers,
- Improved curing uniformity,
- Enhanced resolution and surface finish.
This is especially important in resins designed for investment casting (e.g., wax-filled or pigmented castable resins), where pigment density and filler particles further thicken the material.
- Ideal Temperature Range
Most high-viscosity castable resins respond well to mild heating:
- The recommended temperature range is 30°C to 35°C (86°F to 95°F).
- At this temperature, resin flows more freely without altering its chemical stability or curing behaviour.
Some manufacturers may specify optimal temperature ranges in their datasheets. Always refer to the resin-specific documentation to avoid issues related to material degradation.
- How to Maintain Resin Temperature
Depending on your printer setup and environment, you can maintain optimal temperature in several ways:
- Built-in Resin Heater (if available)
- Some advanced printers (e.g., Prosen Sonic Mighty 8K, Anycubic Photon M5s) come with built-in resin heating systems.
- Enable the heater through the printer’s touchscreen menu and allow the resin to preheat for 10–15 minutes before starting the print.
- External Resin Heating Pads or Sleeves
- Flexible silicone heater wraps designed for resin vats or bottles can gently raise the temperature.
- Use a digital temperature controller to prevent overheating.
- Avoid heating directly with open heat sources (e.g., hairdryers or heat guns), which can cause uneven heating or thermal stress.
- Heated Enclosure or Warm Room
- Print in a temperature-controlled environment (ideally 25°C to 30°C).
- Enclose your printer in an insulated box or tent to retain warmth.
- Use a small ceramic heater or incubator-style heating element with a thermostat to keep the enclosure warm and stable.
- Warming Resin Before Use
Even before pouring the resin into the vat:
- Pre-warm the resin bottle by placing it in warm water (not boiling) for 10–15 minutes.
- Gently rotate or shake the bottle (after warming) to ensure even temperature distribution and proper mixing of pigments or additives.
Avoid excessive shaking, which can introduce air bubbles. Instead, invert the bottle slowly or use a resin mixing wand.
- Avoiding Overheating
While mild heating improves resin flow, overheating must be avoided. Excessive temperatures (above 40–45°C) can:
- Cause the resin to start prematurely curing inside the vat,
- Degrade its chemical stability,
- Alter mechanical properties of the printed part,
- Create excessive odor or fumes.
Use digital thermometers or infrared sensors to monitor resin temperature regularly. If you notice thickened gel-like consistency or clumping, stop the print and inspect the resin for signs of thermal damage.
- Resin Stirring and Handling
High-viscosity castable resins, especially those formulated for investment casting or dental applications, contain various additives—such as pigments, fillers, and waxes—that can settle or separate over time. Proper stirring and handling of the resin are essential for consistent print quality, dimensional accuracy, and reliable burnout performance.

Failing to mix the resin properly can result in:
- Uneven exposure and curing,
- Weak or brittle prints,
- Inconsistent colour or surface finish,
- Failed supports or detached features, and
- Residue during casting due to pigment clumping.
Here’s how to handle and prepare the resin correctly:
- Stirring Before Each Print Session
Always stir the resin thoroughly before each print, whether you’re using a fresh bottle or reusing resin from the vat. This ensures uniform dispersion of:
- Suspended particles (such as wax content in castable resins),
- Pigments (which affect curing and appearance), and
- Photoinitiators (which control how well the resin cures under UV light).
Best practices:
- Use a plastic or silicone spatula or a resin-safe stirrer.
- Stir gently but thoroughly for 2–5 minutes, reaching the bottom of the container or vat.
- Avoid vigorous shaking that introduces bubbles, especially for high-viscosity resins that trap air easily.
- Reusing Resin from the Vat
If the resin has been sitting in the printer’s vat for several hours or days:
- Visually inspect it for signs of pigment separation, surface film, or hardened particles.
- Gently stir the resin in the vat using a soft tool that won’t damage the FEP film.
- For longer idle times (e.g., overnight or longer), it’s recommended to filter the resin before reuse to ensure no cured bits or debris are present.
- Filtering the Resin
Filtering is especially important after failed prints or prolonged storage:
- Use a resin filter funnel or fine mesh paint strainer (100–200 microns).
- Pour the resin back into the original bottle or another clean container.
- Remove any hardened particles, dust, or skin formed on the resin surface.
This step prevents:
- Contamination of the vat or LCD screen,
- Clouding or scratching of the FEP film,
- Curing inconsistencies in future prints.
- Storage and Shelf Life
High-viscosity resins are more prone to separation over time, so proper storage is vital:
- Store resin bottles in a cool, dark, and dry place, ideally between 15°C and 25°C.
- Keep bottles sealed tightly when not in use to prevent moisture absorption and premature polymerization.
- Shake or stir bottles every few weeks if unused for extended periods.
Always check the expiration date and resin condition before printing. An expired or improperly stored resin can yield poor results even with correct settings.
- Tools for Efficient Handling
To streamline handling and reduce human error:
- Use a magnetic stirrer for consistent mixing, especially for larger resin bottles.
- Invest in resin mixing wands or drill-mounted stirrers with low-speed control.
- Keep a set of dedicated resin tools for each type or colour to avoid cross-contamination.
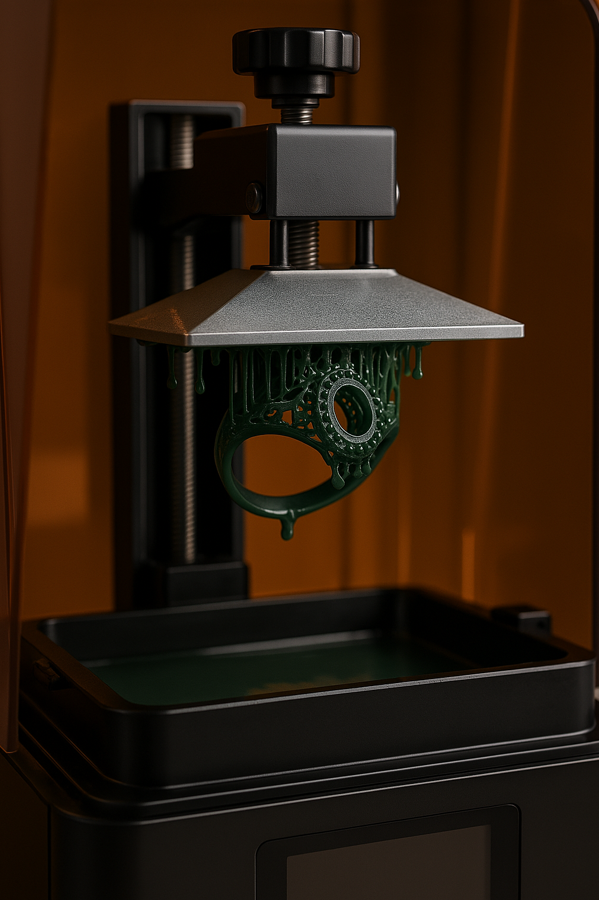
- Use Proper Supports
In resin-based 3D printing, support structures are essential for holding parts in place during the print, especially for overhangs, bridges, and delicate features. When using high-viscosity castable resins, the importance of well-designed supports increases significantly due to the mechanical stresses introduced during layer separation (peeling) and the resin’s resistance to flow.
These resins tend to resist motion and exert greater suction forces during each peel cycle, especially in bottom-up systems like LCD and DLP printers. If the supports are weak, under-sized, or improperly placed, parts may shift, detach, or warp, leading to complete print failure.
Here’s how to design and implement optimal supports for reliable results:
- Stronger, Thicker Support Beams
High-viscosity resins create more resistance during printing. To counter this:
- Use thicker support shafts (e.g., 0.5–1.0 mm or more depending on model size).
- Increase the tip size and contact depth to provide stronger attachment points to the model.
- Select heavy support presets in slicers (e.g., Lychee, ChiTuBox, Voxeldance Tango) rather than lightweight or minimal profiles.
These measures improve the stability of delicate features and reduce the risk of “floating islands” or mid-print failures caused by insufficient support strength.
- Anchor Points and Support Density
For heavy or tall models:
- Increase the density of supports, especially in the first 1–2 cm of the print where peeling forces are highest.
- Ensure each island or separated feature has at least 2–3 support connections.
- Use base platforms or rafts to distribute forces and prevent individual supports from detaching during printing.
You can also use bracing structures (cross-links between support beams) to strengthen tall or fragile supports and reduce vibration during the Z-lift.
- Optimal Model Orientation
Positioning the model at an angle plays a key role in improving print success with high-viscosity resins:
- Tilt the model between 30° and 45° on the X or Y axis (or both).
- Angled positioning:
-
-
- Minimizes the cross-sectional area exposed per layer, reducing peel forces.
- Helps resin flow back beneath the part more easily after each lift.
- Encourages better support coverage under overhangs and critical features.
-
Models oriented flat or vertically may require more aggressive supports and are more prone to warping or failure when printed with thick resins.
- Contact Point Considerations
Castable resin prints are often small and highly detailed, meaning that support contact points must be carefully balanced:
- Too large, and they may damage the surface or require excessive post-processing.
- Too small, and the model may break off during printing due to the added force needed to separate each layer.
Use medium to heavy contact points (e.g., 0.3–0.6 mm tips) and place them in non-critical or hidden areas of the model when possible. Some slicers offer automatic support painting to make this process more efficient.
- Post-Processing and Support Removal
Supports printed with high-viscosity resins tend to be more rigid and may cure harder than standard resins. Therefore:
- Remove supports soon after printing, before full post-curing.
- Use flush cutters or specialized support-removal tools.
- If supports are difficult to remove, soak the print briefly in warm isopropyl alcohol (IPA) to soften them slightly.
Careful removal prevents surface damage, especially in models destined for investment casting, where surface quality directly affects the final mould.
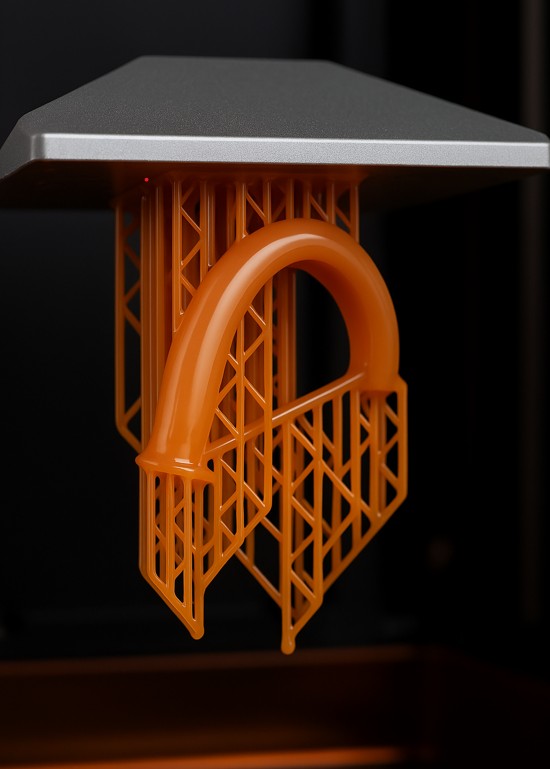
- Resin Drainage and Venting
When printing hollow or partially enclosed models using high-viscosity castable resins, proper drainage and venting are essential. These resins are thicker and flow more slowly than standard resins, making them particularly prone to trapping uncured resin inside cavities or creating strong suction forces during layer separation.
If the resin cannot escape or air cannot enter enclosed areas during the print, the result can be:
- Internal resin buildup that never cures,
- Vacuum suction effects that cause parts to tear or detach mid-print,
- Cracks, warping, or blowouts during post-curing or casting due to pressure buildup inside the part.
To prevent these issues, careful design for resin flow and air exchange is necessary.
- Why Drainage and Venting Are Critical for High-Viscosity Resins
High-viscosity resins do not self-level or escape confined spaces easily. During printing, especially in inverted (bottom-up) printers:
- As each layer is lifted from the FEP film, a vacuum can form inside hollow sections if resin has no way to escape.
- With thicker resin, this vacuum is stronger and takes longer to break, resulting in layer shifting, suction lines, or complete print failure.
- Uncured resin that remains trapped inside cavities can leak, affect part weight, interfere with casting, or cause cracking during curing or burnout.
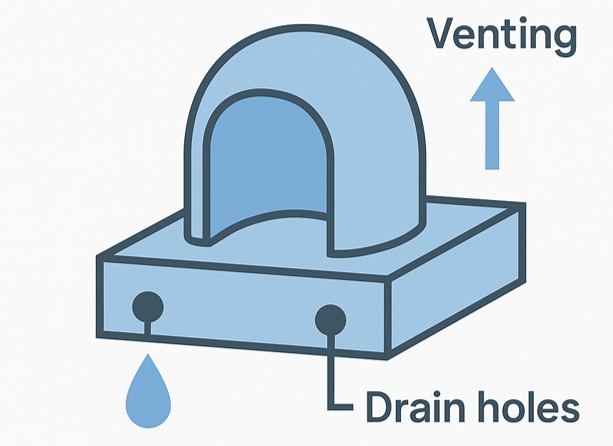
- How to Design Drain Holes
If your model is hollow or contains internal cavities:
- Add drain holes at the lowest points of the model (based on its printing orientation) to allow excess resin to escape.
- Use at least 2 holes (entry and exit) so resin can flow out and air can flow in.
- Recommended hole sizes:
-
-
- Minimum 2.0 mm diameter for standard use,
- 3–5 mm for thick resin or larger volumes.
-
Examples of good drain hole placement:
- Inside ring bands (bottom of the shank),
- Bottoms of hollow figurines or jewellery parts,
- Inside tubes, channels, or tanks.
You can later plug or repair these holes post-processing if needed.
- Venting to Avoid Pressure Buildup
In addition to drainage, vent holes are needed to:
- Prevent air pockets from forming in sealed chambers,
- Avoid internal pressure during the peel process or during UV post-curing and burnout stages in casting.
Without venting, air cannot displace the draining resin, resulting in:
- Incomplete drainage,
- Resin trapping,
- Deformation of thin walls,
- Internal cracking due to expanding gas in the burnout kiln.
Position vent holes at the topmost points of the model (based on print orientation), opposite the drain holes. These allow air to enter as resin flows out.
- Slicer Tools and Model Checks
Most slicer software doesn’t automatically warn you about unvented cavities, so it’s up to the designer to:
- Run hollow model detection in mesh repair tools (e.g., Meshmixer, Netfabb),
- Check for “watertight” geometry that may unintentionally seal off inner areas,
- Simulate print orientation to identify resin traps.
- Alternative Methods for Internal Support and Drainage
For complex internal geometries:
- Use lightweight lattice infills instead of fully hollow interiors. These allow resin to drain more easily while maintaining part strength.
- Consider removable plug-in vent holes, where temporary stoppers can be inserted after printing and cleaning.
- Post-Processing Tips
Post-processing is a crucial phase in the resin 3D printing workflow—particularly when using high-viscosity castable resins, which often leave behind sticky residues or internal uncured resin due to their thick, pigment-rich compositions. These resins are typically used in demanding applications like jewellery casting, dental models, and high-precision prototyping, where surface quality and dimensional accuracy are paramount.
Proper post-processing ensures:
- Full removal of uncured resin,
- Cleaner surfaces,
- Better mechanical properties, and
- Improved burnout performance in casting.
Here are the essential steps to follow:
- Initial Rinse: Removing Surface Resin
Immediately after the print is removed from the build plate:
- Rinse it thoroughly in 95–99% isopropyl alcohol (IPA), denatured alcohol, or resin-specific cleaners like Elegoo Resin Cleaner or Mean Green (if compatible).
- Use a two-stage rinse:
- First container: removes the bulk of uncured resin.
- Second container: provides a cleaner wash and prevents recontamination.
For best results:
- Gently agitate the part in the bath using a soft brush or by swirling it in the alcohol.
- Avoid prolonged soaking (especially more than 5–10 minutes), which can cause softening or surface swelling in some delicate castable resins.
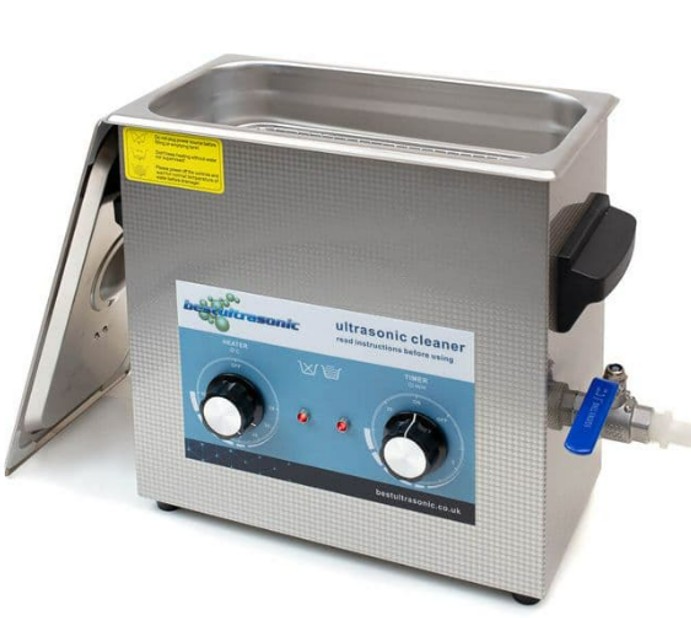
- Ultrasonic Cleaning (Optional but Recommended)
For parts with fine details, deep crevices, or highly pigmented resins, using an ultrasonic cleaner is highly recommended:
- Place the part in a container filled with IPA or resin cleaner and submerge it in the ultrasonic tank (filled with water).
- Run the ultrasonic cycle for 3–5 minutes but avoid overly long sessions which could damage fragile parts.
Ultrasonic waves help:
- Dislodge resin from small holes and surface textures,
- Ensure uniform cleaning without manual scrubbing,
- Reduce risk of residue that can affect curing or casting.
- Drying the Part
After cleaning:
- Air-dry the part or use compressed air to blow out residual IPA, especially from holes, undercuts, or internal cavities.
- Ensure that no trapped alcohol remains inside hollow models, as it can cause cracking or bubbling during UV curing.
Allow the part to dry completely before moving to the curing stage.
- Post-Curing Under UV Light
Post-curing strengthens the printed part and completes the polymerization process:
- Use a UV curing chamber or high-power UV lamp (405 nm wavelength is standard for most castable resins).
- Cure time depends on resin type, part geometry, and UV intensity—typically 5–30 minutes per side.
- Rotate or reposition the part during curing to ensure all surfaces are evenly exposed.
For castable resins, over-curing can sometimes lead to excessive brittleness, while under-curing may leave the part too soft and affect burnout. Always follow the manufacturer’s specific instructions.
Tip: Use a turntable inside the curing chamber for better exposure and consider curing parts submerged in water or glycerine (if the resin allows) to reduce oxygen inhibition and improve surface curing.
- Support Removal (Before or After Curing?)
- For brittle castable resins, it’s often best to remove supports before post-curing, while the material is still slightly flexible.
- Use flush cutters or precision snips, and sand or file contact points as needed.
- If supports are hard to remove or risk damaging the model, partially cure the part first, remove supports, and then finish the curing cycle.
- Final Surface Preparation (Optional for Casting)
Depending on the application:
- For direct casting, leave the surface as-is to preserve dimensional fidelity.
- For visual models, you may lightly sand, polish, or prime the surface.
- Use UV-blocking primer to prevent over-curing if the model will be exposed to sunlight before casting.
Conclusion
Successfully printing with high-viscosity castable resins requires a combination of optimized hardware, software, and material handling techniques. From selecting the right build plate surface to adjusting exposure settings and ensuring proper temperature control, each step contributes to higher print reliability and better final quality. With the right approach, even the thickest resins can produce precise, high-performance results.